Fix five common blast freezer problems—temperature swings, frost buildup, door leaks, compressor faults, and drainage—plus practical preventive maintenance tips.
Blast freezers are critical infrastructure — and when they fail, the losses are immediate. Temperature swings damage product. Ice buildup kills compressors. Drainage failures create structural damage and safety hazards. Here are the five most common problems, what causes them, and exactly how to fix them.
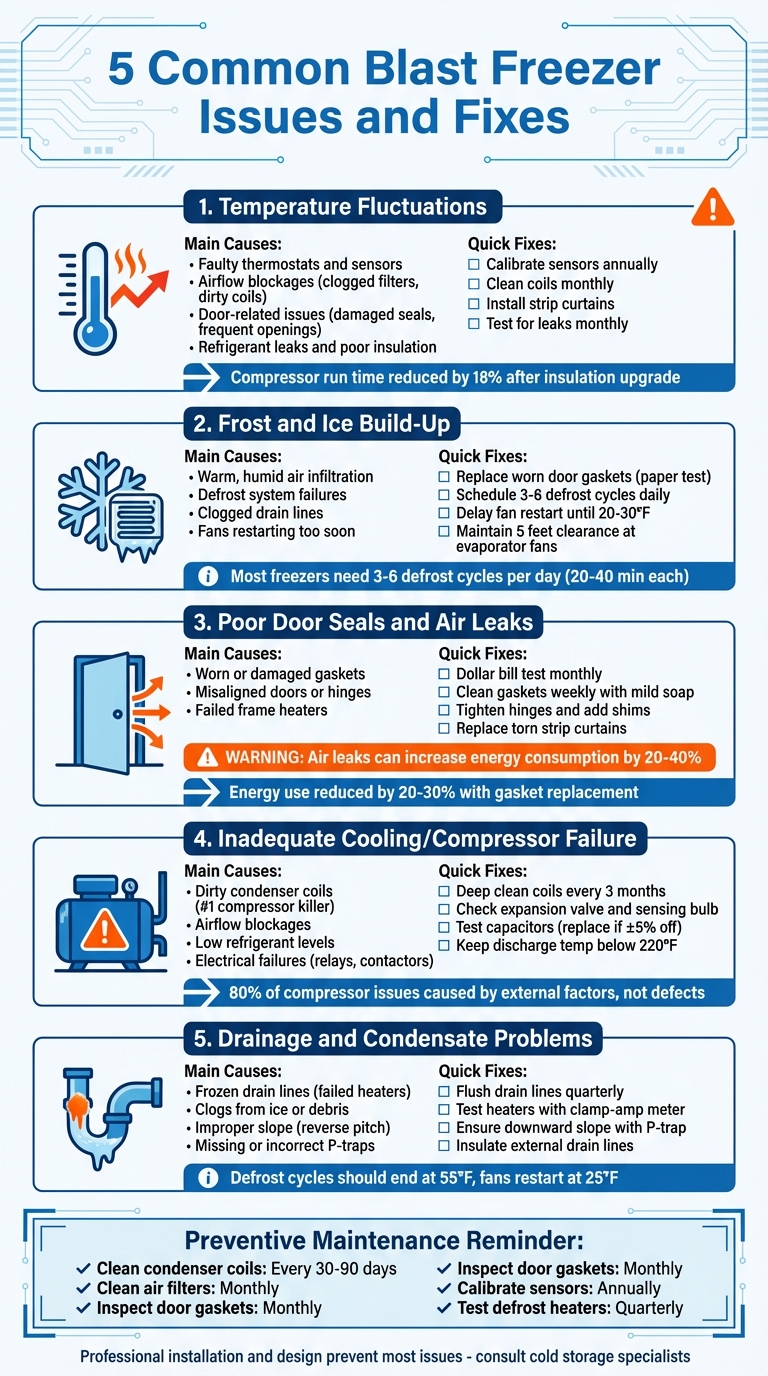
At a glance: Five issues account for most blast freezer failures — all of them preventable with the right maintenance approach:
Temperature Fluctuations: Faulty thermostats, airflow blockages, or refrigerant leaks. Fix with sensor calibration, coil cleaning, and air leak sealing.
Frost and Ice Build-Up: Humid air infiltration or defrost system failures. Fix with door seal inspection, adjusted defrost schedules, and humidity management.
Poor Door Seals and Air Leaks: Worn gaskets or misaligned doors let warm air in, spiking energy use 20–40%. Fix with regular inspection and gasket replacement.
Cooling or Compressor Issues: Dirty coils, refrigerant problems, or electrical failures overwork compressors. Fix with coil cleaning, refrigerant checks, and electrical diagnostics.
Drainage Problems: Clogged or frozen drain lines cause refreezing and ice hazards. Fix by flushing drains, testing heaters, and verifying proper slope.
5 Common Blast Freezer Issues: Causes and Solutions
1
Temperature Fluctuations
Even a few degrees of temperature swing can wreak havoc. Ice crystals form, textures degrade, shelf life drops. For vaccines stored outside the 36°F–46°F range, the damage is permanent — there's no recovering a batch. These aren't just operational inconveniences. They're profit losses and regulatory violations waiting to happen.
Common Causes
Faulty thermostats and sensors: Inaccurate readings cause the system to overshoot or miss target temperatures entirely.
Airflow blockages: Clogged filters, dirty coils, or products stacked too close to evaporator fans create uneven cooling.
Door-related issues: Damaged seals or frequent door openings let warm, humid air in — disrupting the system every time.
Refrigerant leaks and poor insulation: Leaks or weak insulation at wall joints cause thermal bridging, forcing the system to work harder.
“Even small deviations from set temperature can cause major performance losses over time.”
— Standard Tech
Real-world example: In September 2025, a U.S. dairy cold storage facility faced 5–7°F fluctuations during peak summer loads. The culprit was weak insulation joints on a west-facing wall. After upgrading to high-density polyurethane panels and adding reflective paint, temperature stabilized at 39°F ±0.9°F and compressor run time dropped by 18%.
How to Fix It
Sensor calibration: Recalibrate and reposition sensors annually, away from entry points.
Regular cleaning: Vacuum air filters monthly; clean condenser and evaporator coils to maintain efficient heat exchange.
Minimize warm air entry: Install strip curtains, air curtains, or fast-closing systems. Each door opening adds 10–15 minutes of compressor run time.
Leak prevention: Test for refrigerant leaks monthly.
Advanced monitoring: Cloud-based IoT systems with real-time alerts and thermal mapping identify problem zones before they escalate. A pharmaceutical hub reduced false temperature alarms by 70% by adding air curtains and repositioning sensors to mid-room positions.
2
Excessive Frost and Ice Build-Up
Ice on evaporator coils acts like a blanket — it blocks heat transfer and forces the compressor to work harder to hold temperature. That means higher energy bills. But the problems compound: excessive ice damages fan blades, compromises structural floor panels, and in older freezers with deteriorating insulation, forms internally where you can't see it.
Common Causes
The main driver is warm, humid air getting in. Every door opening introduces moist air that freezes on contact. Faulty gaskets, worn hinges, or damaged seals make it worse. Defrost system failures — burned heating elements, failed sensors, broken timers — prevent ice from clearing as it should. Most commercial freezers need 3 to 6 defrost cycles daily, each lasting 20–40 minutes and terminating around 55°F. When cycles fail, ice accumulates fast.
Drainage problems compound the issue. Clogged drain lines or broken heat tape cause meltwater to refreeze in the drain pan or at the threshold — what technicians call “glaciers” near the door. Restarting fans too soon, before coils cool to 20°F–30°F, spreads moisture as snow-like deposits on ceilings and lights.
Symptom
Likely Root Cause
Thick frost on the first few inches of the coil
Warm air infiltration from the door
Evenly iced coil from end to end
Defrost system failure (heaters, timer, or sensor)
Snow on the ceiling or icicles on lights
High humidity combined with failed fan delay
Drain pan icing
Clogged drain lines or failed pan heaters
How to Fix It
Start with a “paper test” for door seals: close the door on a piece of paper. If it slides out easily, replace the gasket. Clean gaskets monthly with mild soap and warm water. Switch to temperature-terminated defrost cycles to avoid overheating. Delay fan restarts until coil temperature drops to 20°F–30°F. Mop up standing water immediately and never put hot, steaming products into the freezer without pre-cooling. Keep at least 5 feet of clearance in front of evaporator fans.
“Frost on coils, snow on the ceiling, or a slab of ice at the threshold isn't 'just a housekeeping issue.' In commercial walk-ins it's a symptom that air, heat, or defrost control is out of balance.”
— ALANSY Appliance Repair & Refrigeration
3
Poor Door Seals and Air Leaks
A single worn gasket can boost energy consumption by 20–40%. Replacing it can cut energy use by 20–30%. That's one of the highest ROI maintenance tasks in any cold storage facility — and it's often overlooked until the damage is already done.
Beyond energy: air leaks cause frost buildup on evaporator coils, which reduces airflow and acts as insulation. Temperature fluctuations push the facility into unsafe ranges, accelerating spoilage and creating food safety exposure. Commercial refrigeration can account for up to 40% of a professional kitchen's energy costs — minor air leaks are not minor problems.
How to Identify Air Leaks
Dollar bill test: Close the door on a dollar bill at multiple points around the frame. If it slips out easily, the seal is failing.
Flashlight test: Place a flashlight inside, darken the room, close the door. Light around the edges means gaps.
Tactile test: Run your hand along door edges. A cold draft means a leak.
Test Method
How to Perform
Failure Sign
Dollar Bill Test
Close door on a bill at various points
Bill slides out easily
Flashlight Test
Flashlight inside, darken room, close door
Light visible around gasket edges
Tactile Test
Run hand along door edge
Cold draft felt at any point
Also inspect for compression set — where rubber becomes flat and hard — visible tears, cracks, or weak magnets. Check the door frame and threshold: they should feel slightly warm. If they're cold, the frame heater has failed, and ice is forming and prying the seal open.
How to Fix It
Clean gaskets weekly with mild soap and warm water. Avoid bleach — it degrades rubber. For minor warping, use a heat gun to restore shape temporarily. For cracks, tears, or permanent flattening, replace the gasket. When installing a new one, soak it in warm water for 15 minutes first to increase flexibility, fit corners before sides.
“A perfect gasket can't seal a crooked, unheated frame.”
— ALANSY Appliance Repair & Refrigeration
Check and tighten hinge screws, shim sagging doors, and replace worn cam-lift hinges. The door should self-close and latch from 6–8 inches open. Install full-width strip curtains with proper overlap as a secondary moisture barrier. Verify frame and threshold heaters are functioning — failed heaters let ice form and pry seals open.
“Tight gaskets + aligned hardware = less moisture in, less ice out, lower bills, longer equipment life.”
— ALANSY Appliance Repair & Refrigeration
4
Inadequate Cooling or Compressor Failure
Here's what most people get wrong: when a blast freezer fails to hit target temperature or the compressor shuts down, the compressor itself is rarely the root cause. About 80% of compressor failures are caused by external factors — heat, restricted airflow, or electrical problems — not a defect in the compressor. Push a compressor beyond its limits and it generates excessive heat. Above 225°F (107°C), lubricants break down, internal components degrade, and failure follows.
Main Causes
“A dirty coil or dead fan is the #1 compressor killer — head pressure soars, amps climb, overload trips.”
— ALANSY Appliance Repair & Refrigeration
Grease and lint on condenser coils trap heat, increase head pressure, and force the compressor to draw more power until it overheats. Clogged filters, obstructed vents, or ice-covered evaporator fans prevent cold air from circulating — same result. Low refrigerant from leaks or incorrect oil-refrigerant ratio raises suction temperatures and reduces cooling capacity. Faulty start relays or damaged contactors cause short-cycling. Blocked TEVs or clogged liquid line driers restrict refrigerant flow and can cause frost on the suction line. Liquid slugging — when liquid refrigerant enters the compressor instead of vapor — bends internal reed valves and destroys the unit.
Symptom
Likely Root Cause
Recommended Fix
High head pressure + high amps
Dirty condenser or fan failure
Deep clean coils; replace fan motor
Low suction + high superheat
Low refrigerant charge or leak
Repair leak; weigh in factory charge
Frost on suction line
Liquid floodback / failed TEV
Restore superheat control; insulate bulb
Compressor hums but won't start
Bad start capacitor or relay
Test and replace start components
Sudden temp drop across drier
System restriction
Replace drier; evacuate and recharge
How to Fix It
Clean condenser coils: Deep clean every three months — monthly in greasy environments. Maintain 6–12 inch fan clearance. Rinse from the clean side outward.
Check the expansion valve: Ensure the sensing bulb is secured and insulated. Frost at the TEV or a sudden temperature drop across the drier means address the restriction immediately.
Run electrical diagnostics: Confirm line voltage is within ±10% of rated value under load. Test start and run capacitors — replace if readings are off by more than 5%. Inspect contactors for pitting.
Monitor discharge temperature: Keep below 220°F. If the compressor shell is excessively hot or the suction line is icing back toward the compressor, shut down immediately.
Maintain air filters: Clean monthly to reduce compressor strain.
Real-world example: At a quick-service restaurant, a technician found head pressure at 310 psig and discharge temperature at 240°F, with the room at 97°F. After deep cleaning the coil and improving ventilation, the freezer hit setpoint within 90 minutes.
5
Drainage and Condensate Problems
Drainage failures don't announce themselves quietly. During defrost cycles, coils shed ice — that meltwater needs a clear exit path. When drain lines are clogged, improperly sloped, or frozen, the water refreezes. That ice blocks airflow, damages the freezer structure, and creates slip hazards serious enough to shut down operations.
Common Causes
Frozen drain lines are the most frequent culprit. When drain pan heaters or heat tape fail, meltwater refreezes before it can exit. “Glaciers” form at the freezer threshold — thick ice sheets that freeze doors shut and create fall hazards. Improper installation compounds the problem: a drain line sloping upward traps standing water that freezes. Missing or incorrectly installed P-traps let air into the system and disrupt flow.
“Ice forming just on the drain line may be from a cracked line; however, icing at the drain pan can be either a plugged drain or a defective heater.”
— Joe Marchese, HVACR Service Contractor
“Trapped water that freezes can do significant structural damage to a freezer; especially older ones where cracks allow water to seep in, then freeze and expand.”
— Eric Borchardt, Energy Engineer, Michaels Energy
Problem
Likely Cause
Recommended Fix
Ice in the drain pan
Plugged drain or defective heater
Clear blockage; test heater resistance
Glacier at the threshold
Failed heat tape or threshold heater
Replace heat tape; re-pitch drain line
Water refreezing on floor
Poor drain slope or failed heat tape
Re-pitch drain line; insulate external drains
How to Fix It
Flush drain lines every quarter to clear debris. Use a clamp-amp meter to verify drain pan heaters and heat tape are drawing correct current. Drain lines must slope downward and include a P-trap. For external drain lines leading to floor sinks, add insulation and heat tape to prevent freezing outside the freezer. Train staff to mop up standing water after defrost cycles and never prop doors open during stocking.
Most commercial blast freezers need 3–6 defrost cycles every 24 hours, lasting 20–40 minutes each, terminating at coil temperature around 55°F — not by timer. Evaporator fans should restart only after the coil drops below 25°F to prevent moisture from blowing into the facility.
6
Preventive Maintenance and Best Practices
Reactive repairs in a blast freezer are expensive — you're fixing equipment in sub-zero conditions, often during peak operations. Preventive maintenance costs a fraction of that and extends equipment lifespan significantly.
Designing for Reliability
The foundation is construction quality. PIR or PUR insulated panel systems with every joint, corner, and ceiling panel properly sealed prevent cold air loss and warm air infiltration. Even small penetrations for pipes or electrical wiring need to be sealed — they're entry points for humid air and frost. Fan positioning must allow unobstructed circulation. System capacity must match actual load requirements. Heated air vents near doorways balance pressure; PVC strip curtains cut warm air infiltration at entry points.
Routine Maintenance Schedule
Maintenance Task
Frequency
Component
Clean condenser coils
Every 30–90 days
Condenser
Clean air filters
Monthly
Air intake
Inspect door gaskets
Monthly
Door / seal
Test defrost heaters
Quarterly
Heating elements
Calibrate sensors and probes
Annually
Thermostat / probes
Lubricate moving parts
Per manufacturer
Fans / compressor
Conclusion
Five issues. All preventable. The pattern across every failure mode is the same: small problems ignored become expensive structural and mechanical events. Ice on coils is not a housekeeping issue — it's a system imbalance. A worn gasket is not a cosmetic problem — it's a compressor stress event in slow motion.
“By addressing small problems before they turn into major failures, technicians can help businesses maintain efficient refrigeration systems, reduce service calls, and extend equipment life.”
— Chris Thomas, Supervisor of Product Services, Heatcraft Refrigeration Products
Maintenance alone isn't enough if the facility was designed or built with problems baked in. Airflow, insulation, drainage slope, panel sealing — these are design decisions that are easy to get right during construction and extremely costly to fix after commissioning. A properly built blast freezer has fewer issues to maintain in the first place.US Cold Storage Builders handles every aspect of blast freezer projects — from design and engineering through insulated panel installation, refrigeration integration, and commissioning — ensuring your facility is built to perform from day one.
frequently asked questions
FAQ — Blast Freezer Issues and Maintenance
How do I know if my blast freezer needs service now?
Act immediately on any of these: high temperature alarms, visible ice buildup on coils or door frames, water pooling or refreezing on the floor, unusual noises from the compressor or fans, or temperature readings that won't stabilize at setpoint. These aren't warning signs to monitor — they're active failure events. Each one indicates either a defrost, airflow, refrigerant, or seal problem that will get worse and more expensive the longer it runs.
What maintenance tasks should I schedule each month?
Monthly: clean condenser coils (more frequently in greasy environments), inspect door gaskets with the dollar bill test, clean air filters, and verify defrost cycles are terminating by coil temperature rather than timer. Check for ice accumulation at the door threshold, drain pan, and coil ends — each location points to a specific failure. Confirm trays are stacked with adequate clearance from evaporator fans for proper airflow.
When should I replace door gaskets instead of adjusting them?
Replace immediately if you see visible tears, cracks, or permanent flattening (compression set). If the dollar bill test fails at any point around the frame, the gasket is no longer doing its job — adjustment won't fix it. A sagging door or misaligned frame can look like a gasket problem, so check hinge hardware first. But if the gasket itself is mechanically compromised, replacement is the only correct answer. Delaying it means paying for that energy loss every hour the freezer runs.