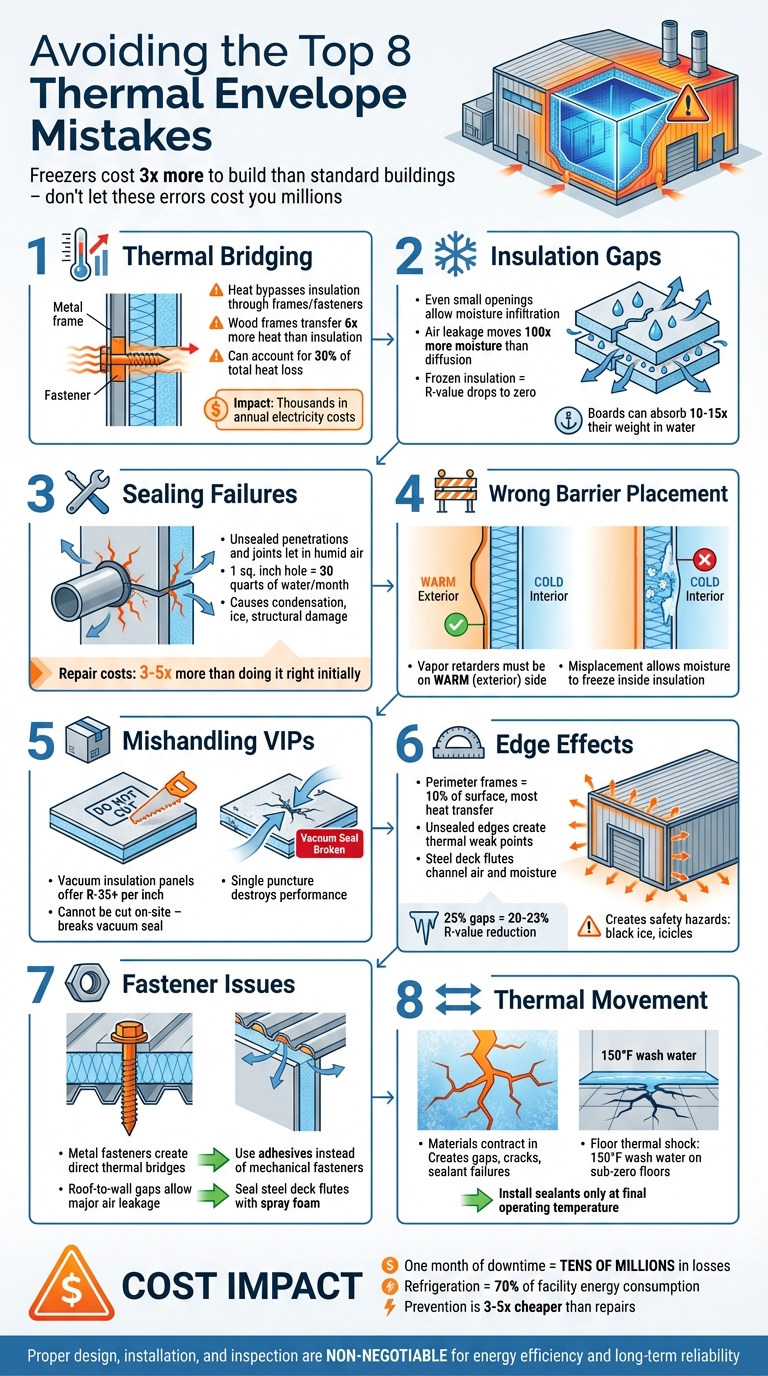
Avoiding the Top 8 Thermal Envelope Mistakes in Freezer Construction
Eight freezer thermal-envelope mistakes—bridging, insulation gaps, poor seals, VIP damage and thermal movement—that cause energy waste and expensive downtime.
Freezer Construction Thermal Envelope Knowledge Hub
Freezers cost three times more to build than standard warehouses — and minor thermal envelope mistakes can turn that investment into a liability. Air leakage, insulation gaps, and improper sealing don't just waste energy. They cause structural failures, regulatory shutdowns, and losses that reach into the tens of millions.
At a glance: Eight thermal envelope mistakes drive most freezer construction failures. Here's what to watch for:
Thermal Bridging: Heat bypasses insulation through frames and fasteners, driving up energy use and causing ice formation.
Insulation Gaps: Even small openings let moisture in — freezing the insulation and dropping its R-value to zero.
Sealing Failures: Unsealed penetrations and joints let humid air in, causing condensation, ice, and structural risk.
Wrong Barrier Placement: Vapor retarders and air barriers must be on the warm (exterior) side — always.
Mishandling VIPs: Vacuum insulation panels are fragile. One puncture destroys the vacuum and kills their performance.
Edge Effects: Perimeter frames and unsealed edges are hotspots for heat transfer and air leakage.
Fastener Issues: Metal fasteners create thermal bridges; roof-to-wall gaps let in air and moisture.
Ignoring Thermal Movement: Materials contract in extreme cold — causing gaps, cracks, and sealant failures if not designed for.
8 Critical Thermal Envelope Mistakes in Freezer Construction
1
Thermal Bridging at Structural Elements
Thermal bridging happens when structural components — perimeter frames, roof-to-wall transitions, floor-to-wall junctions, metal fasteners — conduct heat faster than the surrounding insulation. In other words: heat finds a shortcut directly from the exterior to your cold interior, bypassing the insulation entirely.
Impact on Energy Efficiency
Wood perimeter frames in structural insulated panels transfer heat up to six times more efficiently than the polyurethane foam they surround. Those frames might only cover 10% of the panel's surface — but they can conduct most of the heat. The result: localized warm spots, condensation, ice formation, and refrigeration systems that work significantly harder than they should.
“The overall electricity cost impact from thermal bridging in supermarket cold storage rooms can be thousands of dollars per year.”
— KPS Global
Studies show thermal bridging can account for up to 30% of total heat loss and worsen U-value estimates by 40%. That's not just an energy cost — it's structural risk. Ice formation in panel joints expands and weakens the building. In food processing facilities, a single month of downtime from thermal failures can cost millions.
How to Fix It
Incorporate thermal breaks — low-conductivity materials at connection points — to disrupt heat flow. Advanced framing systems like FUSIONFRAME embed structural components within an insulated jacket, achieving R-values five times higher than standard wood frames. For existing structures, retrofit with thermal breaks or install heat trace cables to keep surfaces above the dew point.
2
Gaps and Breaks in Insulation Continuity
Even the smallest insulation gap has an outsized impact. Openings let humid air in, which freezes the insulation and drops its R-value — in some cases, to zero.
“The R-value of the insulation is effectively zero when the boards and board joints are frozen.”
— Kristin M. Westover, PE, LEED AP O+M, GAF
In other words: you're paying for insulation that no longer does its job.
Impact on Energy Efficiency
Gaps don't just let in air — they allow moisture to infiltrate at a rate up to 100 times higher than diffusion alone. Roof-to-wall transitions are the most vulnerable area. Metal roof decking with open flutes channels moisture laterally deep into the structure. Once inside, insulation can absorb 10 to 15 times its weight in water, according to research by Simpson Gumpertz & Heger.
How to Fix It
Install rigid board insulation in multiple layers with joints offset both vertically and horizontally to block direct air paths.
Seal steel deck flutes with closed-cell spray polyurethane foam for at least 12 inches from wall intersections.
Replace mechanical fasteners with adhesives for upper insulation layers and roof membranes.
Inspect the thermal envelope right after the drawdown period — that's when thermal contraction makes joints most likely to open.
3
Improper Sealing at Penetrations and Joints
Every pipe, conduit, and panel joint is a potential entry point for warm, humid air. Most people focus on the big envelope decisions and underestimate how much damage a single unsealed penetration can do.
A 1-square-inch hole can allow around 30 quarts of water to enter in a single month. Steel deck flutes act like channels, carrying moisture laterally through the assembly — and the internal condensation that results is often mistaken for roof leaks.
“The air-control layer is more critical for long-term success than the vapor-control layer.”
— James R. Kirby, AIA, GAF
The Reverse Stack Effect
Freezers behave differently than heated buildings. Cold air sinks, creating negative pressure at the roof level. That pressure pulls humid outside air in through any unsealed joints. In the Northeast U.S., where freezers run at 20°F, condensation risk is present for over 80% of the year because exterior dew points consistently exceed interior temperatures.
How to Fix It
Use closed-cell spray polyurethane foam to fill steel deck flutes at wall intersections, extending 12 inches to 4 feet along perpendicular flutes. For piping and conduit penetrations, use flexible flashing boots — they handle both vibration and thermal movement. Select sealants like MS Polymers or 100% silicones that allow ±50% joint movement and can cure at sub-zero temperatures, as low as -40°F.
“Water ingress can freeze and expand, risking structural failure.”
— Blythman, Total Construction
4
Wrong Placement of Vapor Retarders and Air Barriers
Here's what most people get wrong: air leakage moves 100 times more moisture than vapor diffusion. A 1-square-inch hole lets in 30 quarts of water per month. An intact 32-square-foot gypsum sheet lets in 1/3 of a quart through diffusion. The barrier placement decision matters far more than most builders realize.
The Rule That Can't Be Broken
In freezer construction, the vapor retarder and air barrier must go on the exterior (warm) side of the insulation — full stop. Vapor drive moves from the warm, humid outside toward the cold, dry interior. Misplace these barriers and moisture seeps into the insulation, where it freezes. In failed freezer ceilings, insulation boards have been found holding 10 to 15 times their weight in water.
“The vapor barrier is absolutely paramount. Once moisture gets into a cold storage facility, the problems multiply quickly.”
— Adam Bortz, Director of Industrial, Nelson Worldwide
Compliance Requirements
Since 2012, the International Energy Conservation Code (IECC) has required air barriers in new construction. For cold storage, Class I vapor retarders with permeance ratings of 0.1 perms or less are required, meeting ASTM C1136 standards. Proper vapor barrier placement is also a component of FSMA and HACCP food safety compliance. Regulatory agencies have denied permits to facilities with frost heave damage — often caused directly by barrier failures.
How to Fix It
The vapor retarder system must be continuous across all six sides of the thermal envelope. Seal steel deck flutes at wall intersections with closed-cell spray foam. Avoid puncturing the vapor retarder with screws or rivets — use adhered systems instead. Inspect during the drawdown period, when thermal shifts are most extreme. Correctly installed insulated metal panels can reduce electricity use by up to 30%.
5
Mishandling Vacuum Insulation Panels During Installation
Vacuum insulation panels (VIPs) deliver extraordinary thermal performance — a 1-inch VIP achieves R-35 or more, roughly five times better than standard foam. But that performance is completely dependent on maintaining an airtight barrier film at an internal pressure below 0.07 PSI. One puncture from a nail, screw, or rough handling destroys the vacuum — and unlike traditional insulation, there's no fixing it.
What Goes Wrong
VIPs cannot be cut on-site. Any attempt to modify their size breaks the vacuum seal. If 25% of a wall lacks VIP coverage due to gaps or mishandling, overall wall R-value drops by 20%–23%. A study by the National Research Council of Canada found that switching from low-conductivity fiberglass supports to steel z-girts caused a 60% reduction in R-value.
“VIPs bring lab-grade thermal performance into the realm of building construction.”
— Bill Gregg, Business Development Manager, Promat
“At the end of the day, it's inherently easier to execute an installation properly from the get-go than it is to fix something once it's covered up.”
— Jennifer Carr, Architect, Gresham Smith
How to Fix It
Pre-qualify contractors with VIP installation experience. Hold pre-installation conferences and use 3D modeling to ensure accurate panel fit without gaps. Encase VIPs in sandwich systems using a 0.5-inch XPS foam inner layer and pultruded fiberglass z-girts spaced 24 inches apart. For unavoidable gaps around windows or doors, use high-quality spray foam. Inspect every panel for barrier tension loss before installation begins.
6
Ignoring Perimeter and Edge Effects in Insulation Panels
The perimeter structural frame covers about 10% of a panel's total surface area. But it can account for most of the heat transfer into the cold storage space. Wood frames conduct heat up to six times more effectively than the polyurethane core — turning what looks like a minor detail into a major energy and structural liability.
What Goes Wrong at the Edges
Tiny edge gaps create air leakage that carries 100 times more moisture than diffusion alone. Unsealed steel roof deck flutes channel air and moisture laterally, forcing refrigeration units to run longer and consume more power just to hold temperature. Once moisture enters panel joints and freezes, insulation R-value drops to zero at those points.
“Creating airtight transitions from the walls to the roofs is difficult and requires coordination between multiple designers and installers, but can often make the difference between a successful facility and an expensive remediation project.”
— Sean O'Brien, Senior Project Manager, Simpson Gumpertz & Heger Inc.
Beyond energy losses, unsealed edges create safety risks. Ice accumulation at joints produces black ice near doorways and icicles at perimeters — serious slip-and-fall hazards for workers.
How to Fix It
Seal steel roof deck flutes at wall intersections with closed-cell spray polyurethane foam, extending at least 12 inches along the flutes.
Install roof and wall insulation in two layers with offset joints — both vertically and horizontally — to minimize air leakage.
Use advanced framing systems like FUSIONFRAME that embed structural members within an insulation jacket, achieving up to five times higher R-values at the perimeter.
Inspect roof and perimeter seals immediately after the drawdown phase, when thermal contraction is at its peak.
7
Poor Detailing Around Fasteners and Roof-to-Wall Transitions
Metal fasteners are thermal bridges. Every fastener that pierces the insulation is a direct heat path into your freezer space — creating cold spots where condensation forms and reducing the effective R-value of the surrounding insulation.
The Roof-to-Wall Problem
Roof-to-wall transitions are where the reverse stack effect hits hardest. Cold air sinks, creating negative pressure at roof level that actively pulls warm, humid air through any gap in the joint. Steel deck flutes accelerate this by channeling air and moisture laterally across the structure. Over time, ceiling insulation boards can absorb 10 to 15 times their weight in water, leading to ice buildup heavy enough to collapse ceilings.
The drawdown phase amplifies the damage. Rapid initial cooling causes thermal contraction that tears vapor retarders, cracks sealants, and loosens termination bars — if the transitions weren't designed to handle that movement.
“Creating airtight transitions from the walls to the roofs is difficult and requires coordination between multiple designers and installers, but can often make the difference between a successful facility and an expensive remediation project.”
— Sean O'Brien, Senior Project Manager, Simpson Gumpertz & Heger Inc.
How to Fix It
Eliminate thermal bridging: Use adhesives instead of mechanical fasteners for roof membranes and upper insulation layers.
Seal roof deck flutes: Fill with closed-cell spray polyurethane foam at wall intersections, extending 12 inches to 4 feet along perpendicular flutes.
Install double air seals: Apply air seals on both interior and exterior surfaces of insulated metal wall panels at transitions.
Inspect post-drawdown: Check all roof-to-wall transitions for damage caused by thermal movement after the initial cooling phase.
8
Failing to Account for Thermal Expansion and Contraction
When a freezer drops from room temperature to 0°F or below, every component contracts. Materials that weren't designed for that movement crack, gap, and fail — and the problems cascade fast: cracked slabs, compromised vapor barriers, failed sealants, and a thermal envelope that no longer holds.
Impact on the Thermal Envelope
When insulation contracts, gaps form. Water vapor freezes in those gaps, expanding further and separating insulation boards. Thermal shorts develop — direct heat paths into the freezer that force refrigeration systems to overconsume energy. Even a 1-inch square gap can let in up to 30 quarts of water monthly.
“The R-value of the insulation is effectively zero when the boards and board joints are frozen.”
— James R. Kirby, AIA, GAF
Floor Slab and Frost Heave
Freezer slabs are especially vulnerable. Frost heave — caused by freezing ground beneath the slab — can crack concrete and compromise the structure. Install glycol or electric heat-trace systems beneath slabs during construction. Don't skip the redundancy: backup loops ensure protection if one system fails.
Floor joint sealants require careful timing too.
“Only install the sealant once the space is down to the final temperature to ensure the full joint is filled due to contraction of the floor slab.”
— Jennifer Carr, Architect, Gresham Smith
Apply sealants too early and slab contraction leaves gaps that let in air and moisture. And never clean a sub-zero floor with 150°F water without flooring designed for thermal shock — the rapid temperature differential debonds epoxy flooring and often requires complete replacement.
“The resulting thermal shock can lead to debonding of the epoxy flooring and necessitate its partial or complete replacement.”
— Sean O'Brien, Senior Project Manager, Simpson Gumpertz & Heger Inc.
How to Fix It
Bring new freezers to operating temperature gradually over several weeks — let materials adjust slowly. Install insulation in multiple layers with offset joints. Use pre-manufactured flexible flashing boots for pipe penetrations to handle expansion, contraction, and vibration. These steps prevent the expensive repairs that thermal movement causes when it isn't designed for from the start.
How to Build a Proper Thermal Envelope in Freezer Construction
The Exterior Envelope System (EES) is the most reliable approach: place the vapor retarder and air barrier on the exterior — over roof insulation, outside wall insulation, and beneath the floor. This keeps moisture away from cold surfaces and sets the foundation for all the layered insulation decisions that follow.
Install roof insulation in at least two layers with staggered joints. Use adhesives instead of mechanical fasteners to eliminate thermal bridges. Fill steel deck flutes at wall intersections with closed-cell spray polyurethane foam. At roof-to-wall transitions, apply non-curing butyl tape between the top of wall panels and wood blocking — it creates a flexible, airtight seal that handles thermal movement without failing.
Beneath the slab, active heating systems (glycol loops or electric heat-trace mats) prevent frost heave. Commission the facility gradually, tapering temperatures over several weeks to let materials adjust without structural shock.
US Cold Storage Builders integrates these techniques into every freezer construction project — from engineering and permitting through final commissioning — to deliver thermal envelopes that hold up for decades.
Conclusion
Eight mistakes. Each one preventable. Together, they account for most of the energy waste, structural damage, and operational shutdowns that make freezer construction so unforgiving when it goes wrong.
Air leakage alone carries 100 times more moisture into a building assembly than vapor diffusion. Frost heave cracks slabs. Thermal bridging adds thousands in annual energy costs. And a single month of downtime in a food processing facility can mean tens of millions of dollars in lost revenue.
The numbers that define a well-built freezer envelope: R-32 to R-48 for facilities at 0°F or below. Vapor barriers rated below 0.01 perms. Insulation installed correctly reduces electricity use by up to 30%. Precision from the start is the only option that makes financial sense.
“Sealing and insulating the building envelope properly to maintain a continuous vapor barrier and reduce heat transfer is mission critical in successful cold storage design.”
— Jennifer Carr, Senior Architect, Gresham Smith
frequently asked questions
FAQ — Freezer Thermal Envelope Construction
How do I find hidden air leaks in a freezer envelope?
Start at the seals, panel joints, and door perimeters — those are the highest-probability failure points. A smoke pencil or infrared camera can pinpoint drafts and temperature differentials that reveal leaks before ice forms. Schedule pressure tests or blower door tests during commissioning and as part of regular maintenance. Catching leaks early is exponentially cheaper than repairing the structural damage they cause.
What's the correct order to install air and vapor barriers?
Install the air barrier first, then the vapor barrier. Blocking air infiltration takes priority because air leakage moves 100x more moisture than vapor diffusion. In freezer facilities, the vapor barrier goes on the exterior (warm) side of the insulation — not the interior. Seal both barriers thoroughly at every transition point. Gaps at roof-to-wall junctions are where most barrier failures start.
When should envelope inspections happen during startup?
The most critical inspection window is during and immediately after the drawdown period — when cooling systems are first activated and thermal contraction is at its peak. That's when joints open, sealants crack, and vapor retarders tear. Inspect before those gaps freeze over and become invisible. A post-drawdown inspection finds problems while they're still accessible and repairable without shutting down operations.